
The Art of the Two-Tent Tango: Your Veg and Flower Tent Schedule Demystified
So, you’re ready to ditch the batch-and-wait game and step into the glorious world of perpetual harvest. Hell yeah. This means you’re not just growing weed; you’re orchestrating a symphony of growth, a meticulously planned ballet of light, water, and nutrients. At the heart of this operation lies the sacred veg and flower tent schedule. Get this right, and you’ll have a steady supply of sticky buds month after month. Get it wrong, and you’ll have a chaotic mess and a whole lot of waiting.
Let’s be clear: a perpetual harvest isn’t about magic. It’s about math, planning, and a solid understanding of your plants’ lifecycles. The core principle is simple: keep plants in different stages of growth in separate environments. You need a dedicated space for vegetative growth (the veg tent) and another for flowering (the flower tent). Your veg tent runs on a longer light cycle, keeping plants in their leafy, bushy phase. Your flower tent runs on a strict 12/12 light cycle, flipping the switch that tells your plants, “Okay, time to make babies (buds).”
This isn’t just about having two tents; it’s about synchronizing them. It’s about knowing exactly when to move plants from veg to flower, when to start new seeds or clones, and when to harvest. Without a clear veg and flower tent schedule, you’re basically flying blind, hoping for the best. And let’s face it, hoping isn’t a cultivation strategy.
Why You Need a Schedule, Not Just Two Tents
Think of it like this: your veg tent is the nursery, where younglings grow big and strong. Your flower tent is the maternity ward, where the magic of bud production happens. You wouldn’t randomly move babies between these environments, would you? Of course not. The same goes for your cannabis plants. Each stage requires specific conditions, and more importantly, a specific timing.
A well-defined veg and flower tent schedule ensures:
- Continuous Harvests: The ultimate goal. Always have plants ready to flip, always have plants in flower, and always have plants finishing up.
- Optimized Space: You’re not wasting precious tent space with plants that are too big for veg or too small for flower.
- Predictability: You know when your next harvest is coming. No more guessing games.
- Strain Management: Easily manage different strains with varying veg times and flowering periods.
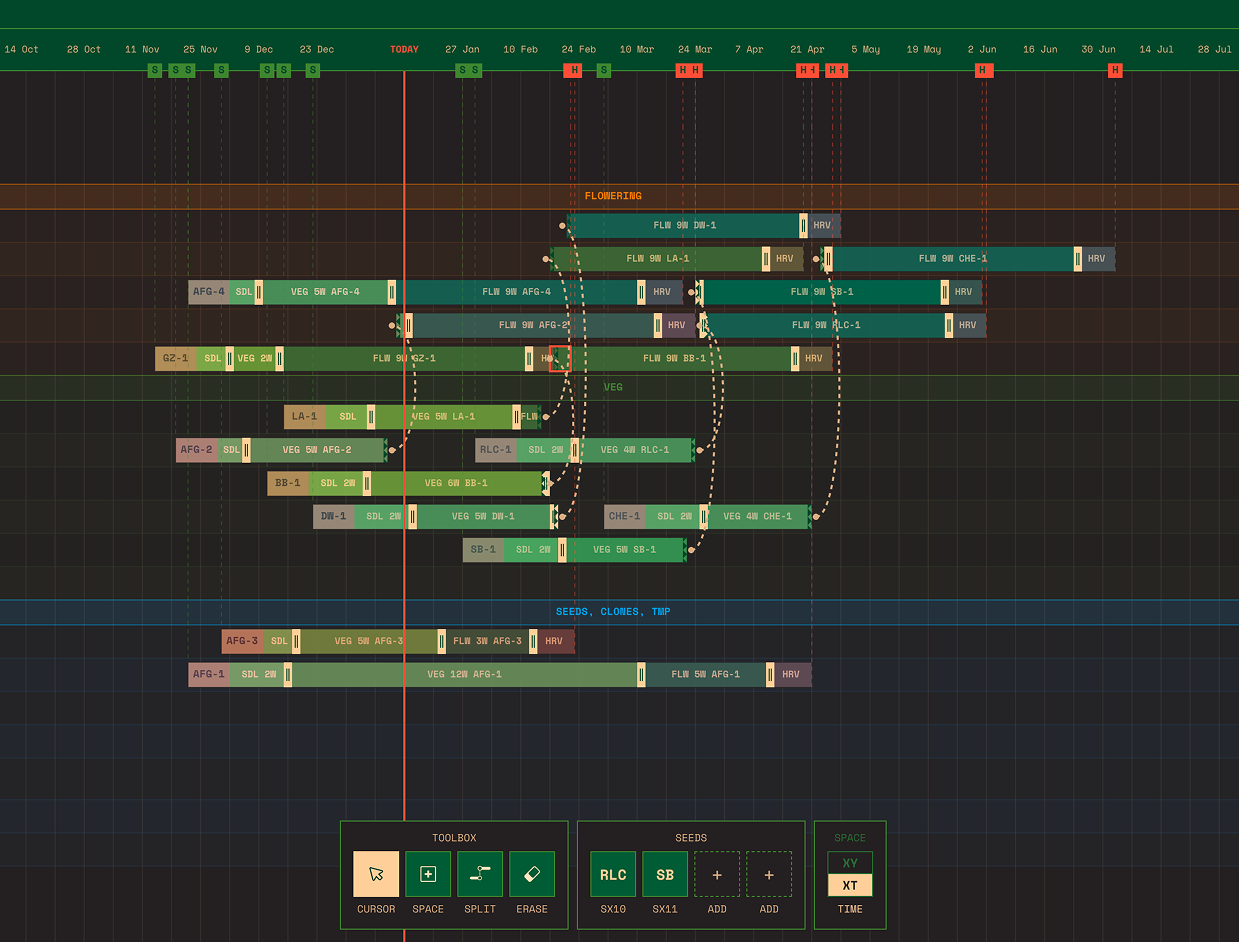
This is where a tool like Plantegia comes in handy. Visualizing your grow timeline, seeing your veg and flower tents side-by-side in the Space view, and easily dragging plants to adjust your schedule – it takes the guesswork out of complex perpetual setups. More on that later.
Plan your grow visually with Plantegia — a free Gantt-style planner built for growers.
Drag plants across time. See germination through harvest. Start planning →
Building Your Veg and Flower Tent Schedule: The Nuts and Bolts
Let’s get practical. How do we actually build this schedule? It boils down to understanding the lifecycle of your chosen plants and then mapping them onto your available tent space.
Photoperiod vs. Autoflowers: The Scheduling Wildcards
First, you gotta know your strains. This is non-negotiable.
- Photoperiod Strains: These are the traditionalists. They require a change in light cycle to initiate flowering. You control when they flower. This gives you immense flexibility for scheduling. Their lifecycle typically looks like this:
- Seedling/Clone Stage: A few days to a week.
- Vegetative Stage: This is where you decide how long. Anywhere from 2 weeks to 2 months (or more, but usually not recommended unless you’re training heavily).
- Flowering Stage: Typically 8-12 weeks, depending on the strain.
- Autoflower Strains: These are the rebels. They flower based on age, not light cycle. They’ll go from seed to harvest in roughly 8-12 weeks, regardless of what you do with the lights (though 18/6 or 20/4 is standard for veg and flower). This makes them fantastic for quick turnaround cycles or for filling gaps, but they offer less control over the start of flowering. You just plant ‘em and let ‘em do their thing.
For a true perpetual harvest with photoperiod strains, your veg and flower tent schedule is king. With autoflowers, it’s more about staggering planting dates.
The Basic Two-Tent Setup: A Perpetual Blueprint
Let’s assume you’ve got two tents: a veg tent and a flower tent. This is the most common starting point for perpetual growers.
Veg Tent:
- Light Cycle: 18 hours on, 6 hours off (18/6) is standard. Some swear by 20/4, but 18/6 is more energy-efficient and perfectly sufficient.
- Purpose: Keep plants small, bushy, and ready to be flipped into flower. You’ll typically have plants at different ages in here at any given time – seedlings, young veg plants, and mature plants ready for the flip.
Flower Tent:
- Light Cycle: A strict 12 hours on, 12 hours off (12/12). No interruptions during the dark period are crucial.
- Purpose: Induce and maintain flowering, leading to bud development and maturation.
Calculating Your Rotation: The Heartbeat of Perpetual Harvest
This is where the veg and flower tent schedule comes alive. You need to figure out how long plants stay in each tent and how that dictates your planting and flipping schedule. Let’s use a common photoperiod scenario:
- Veg Time: 4 weeks (28 days)
- Flower Time: 9 weeks (63 days)
- Total Cycle Time (from seed to harvest): Approx. 13 weeks (91 days)
The Strategy:
- Start New: Every week (or every two weeks, depending on your desired harvest frequency), you start new seeds or pop new clones. Let’s say you start 4 new plants every week.
- Veg Tent Rotation: These 4 new plants go into the veg tent. They will stay here for 4 weeks. So, at any given time, you’ll have roughly 4 weeks’ worth of plants in your veg tent. If you start 4 plants weekly, you’ll have 4 plants in week 1 veg, 4 in week 2, 4 in week 3, and 4 in week 4.
- The Flip: At the end of week 4, those 4 plants are ready for the flower tent. You move them over.
- Flower Tent Rotation: These 4 plants now enter the 12/12 cycle in the flower tent. They will spend approximately 9 weeks here.
- Harvest: After 9 weeks in flower, those 4 plants are ready for harvest. You chop ‘em down.
- Repeat: The day you harvest those 4 plants, you move the next batch of 4 plants (which have now been vegging for 4 weeks) into the flower tent, and you start 4 new seeds/clones in the veg tent. This is the engine of perpetual harvest!
The Result: You have a harvest of 4 plants every 9 weeks. If you started with 4 plants per week, and veg for 4 weeks, you have 16 plants in veg at any time. When they flip, they go into the flower tent. If your flower time is 9 weeks, you need enough space in your flower tent for 4 plants * 9 weeks = 36 plants worth of space spread over time. Wait, that calculation is wrong. Let’s rephrase:
At any given time, in your flower tent, you’ll have plants from week 1 of flower, week 2, week 3… up to week 9. If you flip 4 plants every week, you’ll have 4 plants in their first week of flower, 4 plants in their second week, and so on, up to 4 plants in their ninth week of flower. This means you need enough space in your flower tent to accommodate 9 groups of 4 plants. So, if your flower tent can hold, say, 16 plants, you can flip 4 plants per week, and they will take 9 weeks to finish. Harvesting happens weekly, 9 weeks after they were flipped.
This is where visualizing your whole setup becomes crucial. Seeing your veg tent, flower tent, and the timeline of plant movements in one place is a game-changer. That’s exactly what the Space and Timeline views in Plantegia are built for. You can literally drag and drop plants across your tents and see how your entire schedule shifts in real-time.
Example Calculation: The 3-Tent Perpetual Powerhouse
What if you want faster harvests or have more space? Let’s say you want a harvest every week. This requires more staggering.
- Veg Time: 3 weeks
- Flower Time: 10 weeks
- Harvest Frequency: Weekly
This means you need to be flipping one group of plants every week. If your veg time is 3 weeks, you need 3 groups of plants in veg at any time (Week 1, Week 2, Week 3). If your flower time is 10 weeks, you need 10 groups of plants in flower at any time (Week 1, Week 2… Week 10). Total plants in rotation: 3 (veg) + 10 (flower) = 13 groups. If each group is 3 plants, you’re looking at 39 plants in rotation.
This often necessitates more than two tents. A common setup is:
- Tent 1 (Veg): Houses seedlings and young veg plants. Runs 18/6.
- Tent 2 (Veg/Transition): Houses plants closer to flip or plants needing a bit more veg time. Runs 18/6.
- Tent 3 (Flower): Houses plants in 12/12 for bud production.
In this scenario, you might move plants from Tent 1 to Tent 2 after 2 weeks, then from Tent 2 to Tent 3 after another 1-2 weeks of veg. This allows for more granular control and faster rotation. You’d need a sophisticated veg and flower tent schedule to manage this, tracking each plant’s exact day in its cycle.
Autoflowers and Perpetual Harvest: A Different Rhythm
Autoflowers simplify the flowering trigger but complicate staggering for constant harvests. Since they flower automatically, you can’t just leave them in veg forever. They have a fixed lifespan.
- The Strategy: Plant a few autoflower seeds every week or two. Keep them under 18/6 or 20/4 lights the entire time. Stagger your planting dates so that one small batch finishes every week or two. You don’t need a separate flower tent; the same light cycle works for both veg and flower.
- Example: Plant 3 autoflower seeds every week. After ~10 weeks, you harvest those 3 plants. The next week, you harvest the next 3 you planted. You’ll always have plants in different stages of their 10-week life, leading to a staggered, if not perfectly continuous, supply.
This is great for beginners or those who want less complex scheduling. You can still use Plantegia to map out your autoflower planting schedule, ensuring you never miss a planting day.
Common Mistakes in Your Veg and Flower Tent Schedule
Don’t be the grower who makes these rookie errors. Learn from others’ (often smelly) mistakes.
- Underestimating Veg Time: You’re impatient. You flip plants too early. They stretch like crazy in flower, leading to wispy buds and lower yields. Patience, grasshopper. Give ‘em time to get bushy. Use training techniques like topping and LST to manage their size during veg.
- Overcrowding: Trying to cram too many plants into your tents. This leads to poor airflow, light penetration issues, and increased risk of pests and mold. It also makes your veg and flower tent schedule impossible to follow, as plants don’t grow uniformly.
- Inconsistent Light Cycles: Especially in the flower tent. Light leaks during the dark period can stress plants, causing hermaphroditism or preventing them from flowering properly. Be ruthless about light discipline.
- Not Accounting for Stretch: When you flip photoperiod plants, they often double (or even triple) in height during the first few weeks of flowering. Your veg time and training should prepare them for this. If a plant is already 3 feet tall when you flip it, and it’s going to double, you’ve got a problem, especially in a shorter tent.
- Ignoring Strain Differences: Not all strains have the same veg or flower times. Trying to run a 10-week indica alongside an 8-week sativa in the same flower tent will lead to suboptimal harvests for one or both.
- Forgetting About Curing/Drying: Your harvest isn’t truly done when you chop. Drying and curing take time (weeks!). Factor this into your overall perpetual harvest timeline. You need space and time for this post-harvest process.
Actionable Tips for a Killer Schedule
Ready to level up?
- Label Everything: Date your clones, label your pots with the start date and strain. A simple label maker or even masking tape and a sharpie can save you a world of confusion.
- Keep Detailed Logs: Use a grow journal (digital or physical) to track when you flipped, when you planted, when you harvested. This data is gold for refining your veg and flower tent schedule over time.
- Master Training Techniques: Topping, FIMing, LST (Low-Stress Training), and SCROG (Screen of Green) are your best friends for managing plant size in veg and maximizing canopy space for flower. They allow you to veg plants longer or train them to fit your tent dimensions perfectly before flipping. Learn them. Use them.
- Invest in Good Equipment: Reliable lights, fans, and timers are crucial. A cheap timer failing can ruin a whole crop. Don’t skimp here.
- Plan for Downtime: After a harvest, clean your tents thoroughly. This is a perfect time to dial in your veg and flower tent schedule for the next rotation, check your equipment, and make any necessary adjustments.
- Use a Planning Tool: Seriously, this is where the magic happens. Manually tracking everything is a recipe for disaster. Tools like Plantegia let you visually plan your entire grow. You can see your tent layout, drag plants across a timeline, split them into different stages, and automatically calculate how many fit in each space. It takes the headache out of complex scheduling, especially for multi-tent perpetual grows. You can literally see your entire veg and flower tent schedule laid out before you, making it easy to spot potential conflicts or optimize your rotation.
FAQ: Your Burning Veg and Flower Tent Schedule Questions
Q1: How long should I veg my plants before flipping?
A1: This is the million-dollar question! It depends on your tent height, your training methods, and your desired yield. For a standard 4x4 flower tent that can hold 4-6 plants, vegging for 4-6 weeks is common. If you’re using SCROG, you might veg longer to fill the screen. If you’re topping and training heavily, you can control the final size. Always account for the ~2-3 week stretch period after flipping.
Q2: Can I use autoflowers in a perpetual harvest setup?
A2: Absolutely! But it’s a different kind of perpetual. Instead of staggering veg and flower tents based on light cycles, you stagger planting dates. Plant a few seeds every week or two and keep them under 18/6 or 20/4 lights the entire time. They’ll automatically flower and finish on their own schedule, giving you staggered harvests.
Q3: What’s the minimum number of tents I need for a perpetual harvest?
A3: Technically, you can do perpetual with just two tents: one for veg (18/6) and one for flower (12/12). However, for true, frequent harvests (e.g., weekly), you’ll likely need more space or more tents to manage the different stages effectively. Many growers start with two and expand from there.
Q4: How do I handle multiple strains with different flowering times in my schedule?
A4: This is where it gets tricky. Ideally, group strains with similar flower times together. If you have a mix, you might harvest plants in batches as they finish, or dedicate sections of your flower tent to different strains. Alternatively, you can use a planning tool like Plantegia to visualize these differences and schedule your flips accordingly, knowing that some plants will finish sooner than others.
Keep Your Garden Flowing
Mastering your veg and flower tent schedule is the key to unlocking true perpetual harvest success. It transforms your grow from a sporadic event into a consistent, predictable operation. It requires understanding your plants, respecting their cycles, and employing smart planning. Don’t let confusion about timing or tent rotation hold you back. Tools designed for growers, like Plantegia, can illuminate the path, making complex scheduling intuitive and visual. Stop guessing, start planning, and get ready for a harvest that never truly ends.
Ready to take control of your grow schedule? Head over to Plantegia.com/p/ to start planning your perpetual harvest today. Visualize your tents, map out your timelines, and watch your garden flourish like never before.